RizomUV Bridge for 3ds Max
I've always hated UV mapping. I always found the tools in 3dsmax a little clunky and slow, and really struggled to map anything quickly or efficiently - especially as 3d asset polygon counts have gotten higher and higher.
I found a tool around a year ago called RizomUV that really changed that. Weirdly, I actually have fun UV unwrapping now and the seam and management tools are so much quicker and faster than 3ds Max's built in tools. Unfortunately, because it's a completely separate tool it meant that it broke my workflow a little. The only way to UV map things was to convert-to-editable-poly (losing all modifiers, edits, etc.), export as FBX, UV map, re-import. There is a tool out there that 'bridges' the two apps, but it still only worked on Editable Poly objects and could be a bit hit and miss.
I ended up writing a maxscript tool for myself that works on the top of the model stack and doesn't destructively require a conversion to Editable Poly.
Download
You can download the script for 3dsmax 9+ by clicking here.
Installation
You can activate the script when you want to use it by simply dragging the .mse file onto your 3dsmax window. You can also install the script so that it's always available:
- Hold the Windows key on your keyboard and press R to bring up the run dialog,
- Type in %USERPROFILE%\AppData\Local\Autodesk\3dsmax\ and hit enter,
- You'll see a collection of folders, each one for a different version of 3D Studio Max that you have installed,
- Double click your version of Max's folder (eg. 2020 - 64bit), then double click the ENU folder, then double click scripts, then double click startup. If a startup folder does not exist, simply create a new one.
- Copy the script into the startup folder,
- You may need to restart 3D Studio MAX if you had it open at the time.
Usage
-
 Select the objects that you wish to UV map in RizumUV,
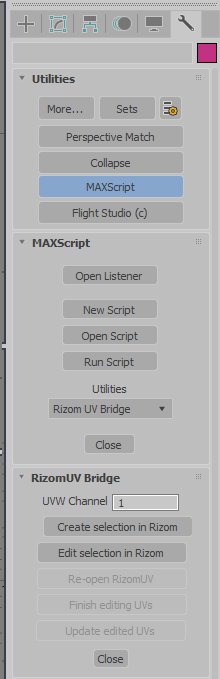
 - Head to the Utilities tab and click the MaxScript button. A 'MaxScript' section will appear below,
- Select RizomUV Bridge from the dropdown. A 'RizomUV Bridge' section will appear below,
- Change the UVW channel from the default if need be,
- Press the Create selection in Rizom button,
- The first time you do this a file browse dialog will appear asking you to locate your RizomUV exe file. Navigate to your RizomUV install (usually something like C:\Program Files\Rizom Lab\RizomUV 2020 and double click rizomuv.exe,
- RizomUV should now start and the select meshes will be loaded, ready for UV mapping,
- Map your meshes as normal in RizomUV and then follow the steps below depending on your 3dsmax version,
3dsmax 9 - In RizomUV choose Save as from the File menu (just using File->Save won't work),
- In the Save as type dropdown select FBX 6.0 binary (*.fbx),
- Save the fbx file, keeping the exact same file name and overwriting the existing.
3dsmax 2008+ - In RizomUV choose Save as from the File menu (just using File->Save won't work),
- Save the fbx file, keeping the exact same file name and overwriting the existing.
-
Now you've saved in RizomUV, you're ready to import your mapping. Simply click the Update x edited UVs button in the RizomUV Bridge section of the plugin,
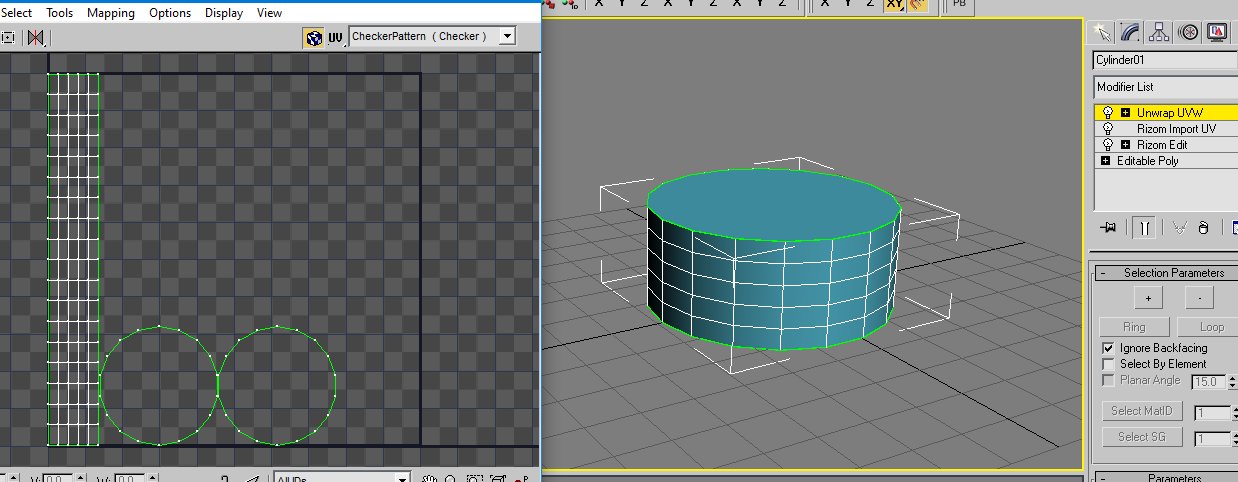
- Two modifiers will be added to the top of each object's stack. A RizomUV Edit modifier and a RizomUV Import modifier.
And that's it. If all went well, the mapping from RizomUV should be transferred to the objects in your scene without anything being destructively lost. You can further modifier the mapping in RizomUV and press the 'Update x edited UVs' button again to reimport the changes. Press Finish editing UVs once you're done.
Note that if your model already has uv mapping and you want to edit the selection in RizomUV, press the 'Edit selection in Rizom' button instead of the Create selection button.
Related by tags
3dmodellingArkwright & Voss
The Gloomnomicon
Perilous Prospector
Reprinted Slipgate from Quake
"Gamepig" from System Shock Remake
March 7th Camera from Honkai Star Rail
"Gamepig" from System Shock 2
Astral Express from Honkai Star Rail
Icarus from Quake 2
Silent Hill 2 - Pyramid Head Minifig
toolImage to Obj tool
3d"Earthworm Jim" from the game
Technician from Quake 2
programmingMultivaders - The original concept
MOTHER - Day time darkness
MOTHER - What is it?
Who I am
I'm Blake and I like to tinker with things and make stuff. When I'm not programming or developing random systems, I'm playing with electronics, doodling bits of art, 3D modelling or sculpting and painting things or nerding out watching sci-fi or horror TV.
From 2001 I worked in the games industry, eventually specialising in tools to aid in the development of video games and their engines. In 2011 I left the industry and teamed up with a few other talented composers to utilise my knowledge to help build the company 'Spitfire Audio'.
I also periodically compose soundtracks for video-games and have worked on titles such as The Stanley Parable, Portal Knights, Lost in Random as well as a few random projects such as trailer for Terraria and Minecraft and the like. You've probably also heard my music in random TV commercials at some point.
What I'm using to develop
If I'm needing raw power, I'm most likely utilising C++ in Visual Studio 2008 (I know, I'm behind the times).
To knock up quick and effective systems, I'm usually using nodeJS in Visual Code.
If it's games stuff, you'll probably find me pottering about with Unreal Engine with a mixture of C++ and Blueprints.